HP LaserJet M1005 - Install HP print software on a network in Windows
HP LaserJet M1005 - Install HP print software on a network in Windows
Introduction
Windows users can use this document to learn how to install print software
for a host-based printer such as the HP Color LaserJet 2600n on a network using the host-based driver solution in Windows 10,
Windows 8.1/8, or Windows 7. To view the recommended solution for another
printer, go to one of the following support pages:
-
Drivers and software support for Windows 10
-
Drivers and software support for Windows 8/8.1
-
Drivers and software support for Windows 7
Step one: Download the driver
-
Go to www.hp.com/support and select your country/language.
-
Select Drivers & Downloads.
-
Type your printer name or model number in the Enter a product name or number search box, and then select Go.
-
Select the HP LaserJet model from the search results.
-
Select the Windows operating system version.
-
Locate the host-based driver option, click Download, click Save, browse to the location where you want to save the .exe file, and then click Save.
NOTE:
If you receive a prompt to install .Net, click OK and follow the steps to install it.
Step two: Check the connections and pre-install the driver files
-
Power on the printer and then wait until it arrives at a Ready state.
-
When the printer Ready light is on and no other jobs are printing, press and hold the Go button on the printer control panel for 5 seconds to print a configuration page and obtain the IP address.
-
Make sure the network cable is connected to the printer and to the computer.
-
Make sure the network is configured and that the computer has an active network connection.
-
Double-click the .exe file downloaded previously.
NOTE:
If you receive a prompt to install .Net, click OK and follow the steps to install it. -
Select I accept the terms in the license agreement, click Next, and then wait while the driver files are pre-installed.
-
When prompted to connect the USB cable, click Cancel to abort the setup, and then click Yes to confirm.

Step three: Install the driver on a network using Devices and Printers
-
Open Devices and Printers.
-
Click Add a printer.
-
While Windows searches for available printers, click The printer that I want isn't listed.

-
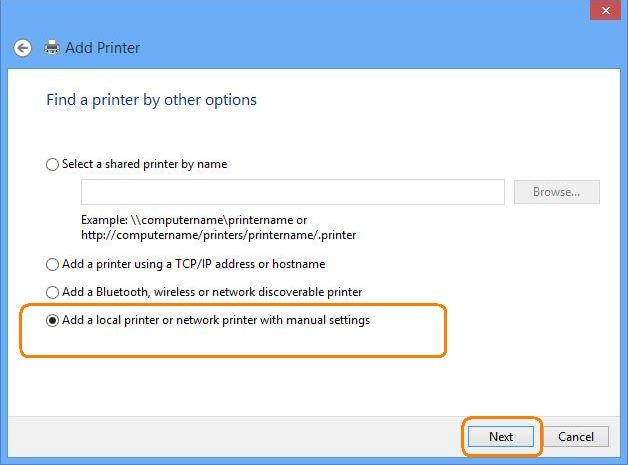
Select Add a local printer or network printer with manual settings and then click Next.
-
Select Create a new port, select Standard TCP/IP port from the drop-down list, and then click Next.
-
Type the printer IP address (or Printer host name), click Next, and then wait while the port is created.
NOTE:
If prompted for an administrator password or confirmation, type the password or provide confirmation. -
Select HP from the Manufacturer list, scroll down to select the printer from the Printers list, and then click Next.
NOTE:
The printer drivers might not be listed in alpha or numerical order. Be sure to carefully scroll through the list to find the correct printer driver. -
If prompted, select Replace the current driver and then click Next.
-
Use the default or type the printer name and then click Next.
NOTE:
If prompted, select Do not share this printer and then click Next. -
Select Set as the default printer, and then click Print a test page.
-
If the test page prints, you do not need to complete Step four: Disable bi-directional support.
-
If the test page does not print, continue to Step four: Disable bi-directional support.
-
Step four: Disable bi-directional support
-
In the Devices and Printers window, right-click the printer and then click Printer Properties.
-
Click the Ports tab, clear the Enable bidirectional support check box, click Apply, and then click OK.
NOTE:
If the bi-directional support is enabled, Windows will display an error message when printing. -
Click the General tab, and then print a test page.
https://support.hp.com/


Comments
Post a Comment